

Introduction#
This was originally posed as a question on Reddit about writing vast amounts of Text onto a Canvas, because “TableView cannot handle the huge amounts of data to be displayed”. Of course, trying to have giant Canvas in a ScrollPane with thousands of lines of data is absolutely not the way to go. On the other hand TableView is exactly designed to handle large data sets while minimizing the use of screen resources.
Once this issue was sorted out, the OP continued on with TableView, but it seemed to me that this was better done as a ListView, and I wondered what it would take to do it. So, here it is.
Source Code#
The source code for this project can be found here
Features#
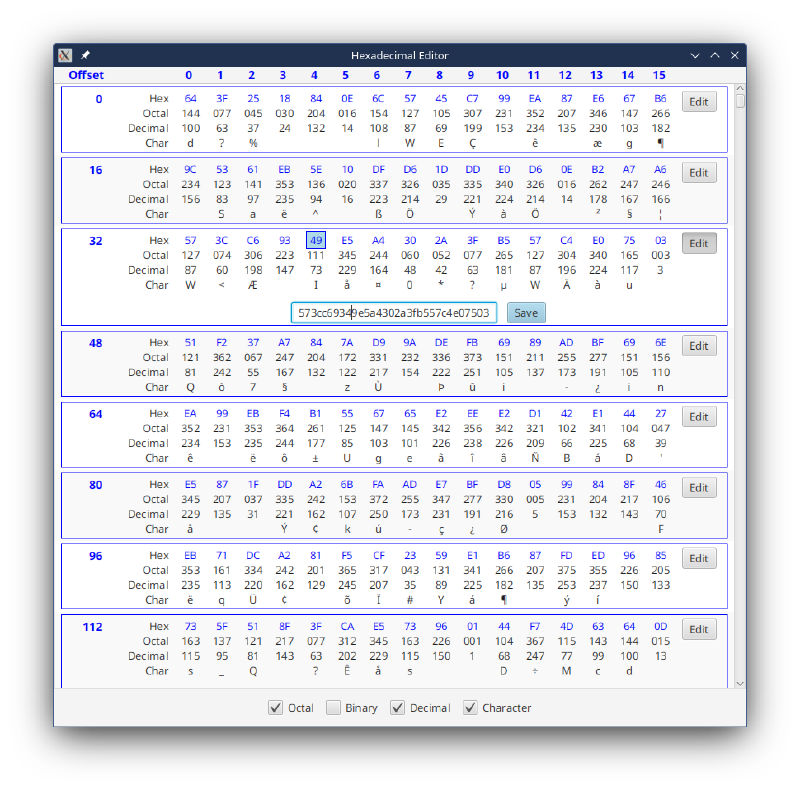
There’s a set of CheckBoxes at the bottom of the screen that control the display of the various formats of the data; octal, binary, decimal and character. Each ListCell has an “Edit” Button which controls the display of the bottom row of the ListCell which has a TextField and a “Commit” Button.
The display is broken up into 16 byte ListCells and each byte of the 16 is displayed in a VBox in the various formats.
All of the actual editing is done through the TextField in the bottom of the ListCell. When editing is happening and the TextField has focus, the hexadecimal display of byte closest to that of the caret in the TextField is highlighted. This isn’t perfect, but early testing revealed that without this indicator it was a little difficult to determine where the caret location corresponded to the byte by byte display.
Programming Notes#
Here’s an overview of how the application is designed, with a few particulars highlighted…
Framework#
Even though this application simply generates a few thousand bytes of random data, it has been designed with an Model-View-Controller-Interactor framework. There’s no file handling in this example, so there’s no Service level, and the Interactor generates the dummy data.
Even given the simplicity of this, you can still see how the MVCI framework works.
The Data Model#
The data model for the application is composed of a single ObservableList<HexRow>. HexRow itself is composed of an Integer to hold the file offset of the first byte in the row, and a ByteArray to hold the actual data.
Note that neither of these to elements is an Observable type of value. There is some overhead to Observable data types, as they have to track Listeners and bound values and invalidation and so on. Generally this isn’t an issue, but if there are millions of bytes of data, each wrapped in an Observable class, it might get out of hand.
What do you lose when the HexRow elements are not Observable? Not a lot for this kind of application. The ListCells are all autonomous, and the Observable elements are all in the local data model inside the ListCell. This is updated via updateItem when the ListCell is recycled, and the code in the “Commit” Button updates item directly.
What is lost is the ability to have the ListCells all automatically redisplay if bytes are added or removed from any row. However, handling this case is going to take a fairly heavy amount of processing regardless, as each HexRow will need to be updated, taking data from one neighbour or another in turn down to the end of the file. In which case the whole list can probably be invalidated, which should cause the ListCells to reload.
ByteArray is interesting itself. It seems to be a Kotlin only data type (yeah Kotlin!) and has some nifty methods to convert to a String in hexadecimal format. It made most of the coding pretty easy.
Data Conversions#
All of the data conversions are done off the hexadecimal String representation of the ByteArray held in the StringProperty encapsulated in ObservableValue.map() functions. This means that these values stay in lock-step as the StringProperty is edited, or the value in the StringProperty is updated via updateItem().
The primary method is called extractHex which pulls two digits from the String based on an index. If the String isn’t long enough, it returns null, so this method returns a String?. The subsequent conversions need to deal with this nullability. Kotlin has a nifty function, String.hexToInt() that takes the String representation of a hexadecimal number and converts it into an Integer, which can then by converted in a different base to display octal or binary through Int.toString(radix).
private fun extractHex(bigString: String, index: Int): String? =
  if (bigString.length > ((index * 2) + 1)) bigString.substring(index * 2, (index * 2) + 2) else null

@OptIn(ExperimentalStdlibApi::class)
private fun toRadix(hexString: String, radix: Int) = hexString.hexToInt().toString(radix)

private fun extractRadix(bigString: String, index: Int, radix: Int) =
   extractHex(bigString, index)?.let { toRadix(it, radix) } ?: ""

@OptIn(ExperimentalStdlibApi::class)
private fun extractChar(bigString: String, index: Int) =
   extractHex(bigString, index)?.hexToInt()?.toChar()?.toString() ?: ""
You can see that the String.hexToInt() function is still experimental, but it seems to work well.
Controlling the Rows#
There’s a data structure called HexCellControlModel. This is composed of a set of BooleanProperties. The main View instantiates this Model and then passes it to the HexEditorCells in their constructors. This way, each HexEditorCell will have a reference to the single Model instance. Then the CheckBoxes at the bottom of the GUI have their Selected Property bound to one of these BooleanProperties in HexCellControlModel.
Inside the HexEditorCell the Labels that display the values have their Visible and Managed Properties bound to one of the BooleanProperties in HexCellControlModel.
In this way, all the ListCells respond in unison to each of the CheckBoxes.
The Heading Row#
The Labels across the top of the ListView are actually not part of the ListView itself. The entire View is a BorderPane with the centre occupied with just the ListView. The bottom has an HBox with the CheckBoxes in it, and the top has an HBox with the heading Labels in it.
All of the VBoxes that make up the main part of the HexEditorCell have a fixed minimum width, and the Labels in the heading row follow along with that.
There’s one quirk, the binary display takes significantly more horizontal space than the other modes, so when it is visible the minimum width has to increase to hold this. This is achieved by using ObservableValue.map() to convert the BooleanProperty into a ObservableDoubleValue that could then be bound to the MinWidth Property of the Labels.
Editing#
Originally, I pondered the idea of having context menus on the Labels for the hex values, and that’s still something that could be added. Instead, I reasoned that the byte by byte display was good for seeing and understanding the data, but it was probably just easiest to edit it as a String in a TextField.
To make it a bit easier to follow how the editing in the TextField related to the byte by byte display, a PseudoClass was added to the hex Labels to indicate that they corresponded to the values near the caret in the TextField. This PseudoClass is styled to put a border around the Label and change the background to a light blue. The border needed to be given insets of “-2” on the top and bottom to avoid having the Label grow vertically when the borders were added and displacing the contents of that column downwards.
The TextField as supplied in this example doesn’t have a Filter or TextFormatter to prevent non-hex digits from being added. This is something that would be needed to put this into production.
Conclusion#
Virtually all of the cool stuff is inside the HexEditorCell, as expected. My original advice to the OP was:
Think if you just had 16 bytes of data to edit on a screen. Not millions of bytes, just 16 and a whole screen to put a layout on.
Would you carve it up into 16 independent cells? Probably not.
What I would probably do is create an HBox with 16 VBoxes inside. Each VBox would hold a Label, one each for hex, octal, binary, decimal and character.
And that’s exacly the process that I took here. Think of how you’d want to see or edit just a handful of data, and design a layout to serve that purpose. Then put it into a ListCell and let the ListView virtualization do the work of loading the data into it.