
Introduction#
People seem to get stuck when it comes to turning their JavaFX application into something useful; something that connects to the outside world, or saves and retrieves its data using a database, or interacts with some other application. I’ve seen this question asked from both directions:
How do I connect my JavaFX application to an SQL Database? I have a screen but I need to be able to save and read information.
or:
I have an application that does this interesting thing, but I’d like to add a JavaFX front end onto it. How do I do this?
These are reasonable questions. How do you do this:
Answer: Use a Standard Framework#
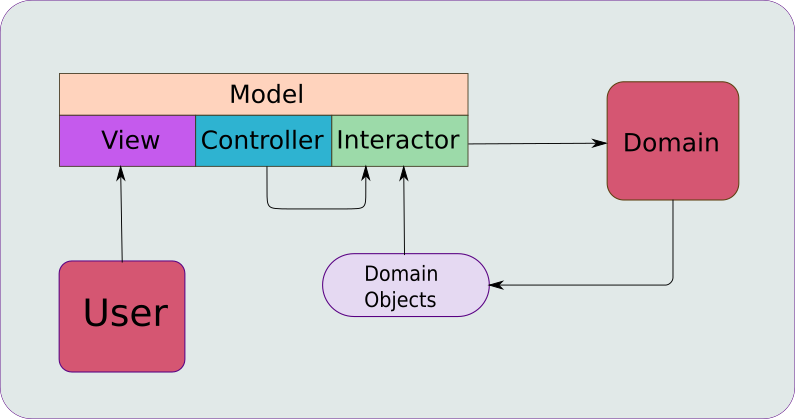
The simple answer is to use a standard framework that will allow you to split your application into two parts. One part is the GUI, and the other is whatever your application actually “does”. Personally, I prefer Model-View-Controller, since it works really well with JavaFX as a Reactive environment. But that just describes the GUI part of your application.
At some point, you have to connect your GUI with the part of your application that does the work - which we’ll call the “domain” code. You need an interface that allows the GUI and the domain code to interact in a particular way. I call that the “Interactor”.
Now your application has three parts:
- The GUI (Model, View and Controller)
- The Interactor
- The Domain Code
Why Do This?#
This first time I was shown an MVC structure I struggled to understand what the benefit was. How does this make it any easier to build an application? I think that there are two key advantages to using this framework.
First, it makes your programming easier to manage because it reduces coupling. Coupling occurs when the parts of application have too many dependencies on each other. It can be insidious, building up a little at a time, until it becomes impossible to change one part of your application because then you have to change something else, and then something else, and so on. Using a framework like MVC-I forces you to keep those pieces apart from each other, right from the start, and gives you clear rules about how much each part is allowed to know about the other parts. In the end, your application structure is much easier to understand.
Secondly, it takes away the blank page syndrome. You’re not starting from zero, and even if it feels a little bit like, “paint by numbers”, at the start it makes very easy to get a bare skeleton up and running - sometimes in just minutes.
The Interactor#
The heart of the question of, “How do I make my JavaFX application do something?”, really comes down to the role of the Interactor.
The Interactor is the only part of your system which has any knowledge about the other two parts. It’s the place where domain objects and the Model can exist together, and you can have code which is aware of both of them.
The Interactor is also the place where your specific application logic goes. While it has knowledge of the domain, its job is to support whatever function within the application that the MVC part of the framework supplies. It’s a part of a process that has the GUI as one end-point, and some “external” domain at the other end, and it contains all of the rules and logic that make the process work.
Example Application - A Simple Weather App#
Here we’re going to look at a simple application that has all of the components that you’ll need:
- A Reactive MVC GUI
- Application logic in an Interactor
- A weather fetching service
- A domain object
- An external API
Before we go any further, let’s see what it looks like when it’s running:
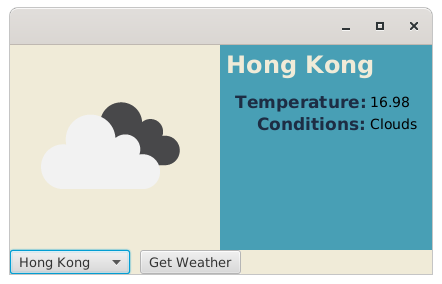
It’s pretty simple. You pick a city from a small list in the ComboBox then click “Get Weather” and it retrieves the information. There’s only 3 pieces of data: the temperature, a description of the conditions, and an image associated with the conditions.
All of this information comes from a web API from openweathermap.org.
API Token#
If you want to run this application, you’ll need an API Token from openweathermap.org. You can get one for free from their site, and the link is on the “Pricing” page, under the “Free” column. You’ll probably be redirected to a login/sign-up page before you get there.
When you get a token (it’s just a string of characters), you’ll need to copy it into a resource file in the project. Under “resources”, create a directory called “data”, and then create a file in it called “api.data”. Then just copy your token into it on the first line. Check the constructor of WeatherFetcher in the source code if any of this is unclear.
The application doesn’t have particularly robust error handling, but if it cannot find the token it will give you a message that it had a problem. If the token is invalid, you just won’t get any weather reports in the GUI.
Application Components#
You should take a look at the project on GitHub. It’s not very big, and I’m only going to include a small part of the code in this article.
The ViewBuilder#
The ViewBuilder is an implementation of the JavaFX Builder utility interface, returning a Region. Using a Builder here is better than the only other real alternative, which would be to extend one of the layout classes, like BorderPane, and configure it through its constructor.
In this case, the Region returned is a BorderPane. The centre of the BorderPane is an HBox holding the weather image, and a VBox that has the city name, and a GridPane with the weather information. The bottom of the BorderPane is an HBox with the city selection ComboBox and the Button which triggers the data load.
All of the styling in the View is done through CSS, which is included in the project.
There are a couple of static convenience classes that instantiate and configure some of the Nodes in the View. This helps to keep the ViewBuilder concerned with layout only, keeps it from getting clogged up with JavaFX boilerplate.
To allow the Button in the View to actually do something, the ViewBuilder is supplied a Consumer<Runnable> by the Controller through a constructor parameter. This is really just a callback containing a callback. We’ll look at this a little later.
Finally, the Model is passed to the ViewBuilder through its constructor, and the Model properties are connected to the View elements as they are instantiated. From this point on, any changes in the Model will be automatically reflected in the View.
The Controller#
The Controller is responsible for instantiating the other MVC components and the Interactor. In this respect it’s the “centre” of the application. The Main class for the application instantiates the Controller in order to bootstrap the GUI, and then calls its getView() method to get the root for the Scene.
The Controller is also responsible for handling FXAT threading. This is important in this kind of application, because virtually anything that needs to talk to the domain code will need to run off the FXAT, and then the effects of that domain code need to be applied back to the model by code running on the FXAT. Usually, this needs to be coordinated with both the View and the Interactor, so the Controller is the right place for that to happen.
The WeatherFetcher#
This is the “domain code” of this application. It’s small, just a single class that is able to perform a couple of HTTP “GET” transactions with openweathermap.org, use some JSON parsing to extract the information and package up the results in a domain object - WeatherData.
It essentially becomes a service, wrapping the calls to openweathermap.org in it’s own logic and the bundling the response into a locally defined domain object.
The Interactor#
This is where the “application logic” resides. The Interactor is instantiated by the Controller, and it is passed the Model as a parameter in its constructor. It has two methods, checkWeather() and updateWeatherModel(). The checkWeather() method invokes a method in the WeatherFetcher, and then stores the WeatherData object that is returned in a private field. The updateWeatherModel() method takes the data stored in that WeatherData object and puts it into the Model.
Although the Interactor has no knowledge, and no logic, that is aware of the FXAT or any other threading issues, the design is such that checkWeather() will be called on a background thread, while updateWeatherModel() will be called on the FXAT.
Invoking the Weather Fetch#
Let’s look at the View first, and the set-up for the Button:
private final Consumer<Runnable> weatherFetcher;
        .
        .
        .
Button button = new Button("Get Weather");
button.setOnAction(evt -> {
    button.setDisable(true);
    fetchWeather.accept(() -> {
        button.setDisable(false);
    });
});
You can see that weatherFetcher is a Consumer<Runnable>. So it’s a piece of code that is going to accept another piece of code as a parameter. Essentially, it’s a callback.
Why do this?
When the Button is clicked, the first thing that we need to do is to disable it, so that it cannot be clicked again while the fetch is happening. But then we need to re-enable it when it’s all done. The problem that we have is that there is no mechanism that allows us to “wait” for the fetch to complete, because that would hang our GUI. So what we have to do is invoke the fetch, and then give the fetcher (whatever it may be) some code to execute when the fetch is completed.
In this case, that code just re-enables the Button.
Now, let’s look at the what weatherFetcher does. It’s defined in the Controller:
private void fetchWeather(Runnable postFetchGuiStuff) {
    Task<Void> fetchTask = new Task<>() {
        @Override
        protected Void call() {
            interactor.checkWeather();
            return null;
        }
    };
    fetchTask.setOnSucceeded(evt -> {
        interactor.updateWeatherModel();
        postFetchGuiStuff.run();
    });
    Thread fetchThread = new Thread(fetchTask);
    fetchThread.start();
}
Here we are defining a JavaFX element called a Task. A Task is JavaFX class which is designed to facilitate running code on a background thread and then get back on the FXAT. It’s possible to have a Task return a result, but in this case we don’t need it to, as the Interactor is going to store the results in a field.
The next thing to note is the call to setOnSucceeded(). Whenever you see a method called setOn...() in JavaFX, that means that you’re going to be passing it an EventHandler. The most important thing about this is that EventHandlers always run on the FXAT. The EventHandler passed to setOnSucceeded() is executed when the Task ends in any way other than throwing an exception. So this call to setOnSucceeded() tells us how the Controller is going to get the processing back on the FXAT after it’s done running on the background thread.
In this case, we want to do two things on the FXAT once the background thread has completed. We want the Interactor to update the Model with the data it just fetched, and then we want to run that code that came from the Button - the one that re-enables the Button.
Finally, the Controller initializes a new Thread for the Task, and starts it.
You should be clear that fetchWeather() itself runs on the FXAT. This means that the Task is configured on the FXAT, the Thread is initiated and started from the FXAT, but everything in fetchTask.call() is executed on that new Thread.
Just to be more explicit, all of this means that interactor.checkWeather() is run in a background thread, while interactor.updateWeatherModel() is run on the FXAT.
Just to be even more explicit: This is the only place in our application code that has any knowledge about the FXAT and the only place where threads are addressed at all. This is one of the main responsibilities of the Controller.
Conclusion#
This is about as simple as you can make an application that has a domain layer but yet it has all of the basic components that you need to deal with. You could clone this project and start changing the names of the classes and the methods and it probably wouldn’t be a bad start.
Yeah, But What If I Really Want To Use FXML?#
I wouldn’t. It doesn’t do anything for you. However, if you must…
Remember that the FXML Controller is NOT an MVC Controller. You need to think of the FXML, FXML Loader and FXML Controller together as the “View” in MVC. And for that matter, the FXML file isn’t a Model either, even though it feels like data.
What you’ll need to do is to create an MVC Controller that instantiates the View by calling the FXML Loader and then passing your Model into the FXML Controller to create the Bindings that connect it to the Nodes in the GUI. If you can do that, then the rest of your application structure should be just as described in this article.
But once again, I wouldn’t bother with FXML.